
Beta软件免责声明
这个项目最初是由Silverlight 2 beta 1构建的,与所有beta程序一样,后面的发行版包括的重大改变将会使修改用早期版本构建的程序非常痛苦,按照墨菲定律,Silverlight 2 beta 2恰好在本文按预定日期发布后的几天就发布了,因此我们对代码(也包括本文)进行适当的修改,以保证完全兼容Silverlight 2 beta 2。
从好的方面来看,后面的版本会修复发现的问题,如为用户登记使用文本框的弹出窗口异常(http://www.devx.com/RIA/link/38139),记得将来Silverlight 2更新后回来这里检查项目的更新。
使用beta软件的另一个问题是它不会总是按照想要的那样精确地工作,例如:参考由Michael Sync, Shawn Wildemuth和Delay写的文章列出的beta1中的问题,Silverlight Beta 2问题可以在Silverlight论坛(http://www.devx.com/RIA/link/38264)去寻找,在Scott Guthrie的Silverlight Beta 2邮件列表中的注释部分也能找到,在Tim Anderson的博客(Upgrading to Silverlight 2, Silverlight, VS Setup Hassles 【http://www.itwriting.com/blog/ p=664】)中也有提及。
我们发现使用Silverlight 2是非常有益的,毫无疑问,这是一项非常有前途的技术,目前微软公司也是加大力度在这方面的投入和研究,预计下一个版本将会包括上百个新的控制,在北京20008夏季奥运会期间Silverlight的市场将会呈爆炸性增长,NBC已经决定使用Silverlight技术在他的网站上展示交互式视频。假如你关注你作为一名程序员未来的市场前景,那么请尽早学习Silverlight技术是一个重要的战略。
布局&UI设计
我们通过选择模仿标准水印设计而不是早期的XBAP设计开始我们的布局设计,虽然在Visual Studio 2008中对XMAL设计做了大量改进,我们发现在布局设计时混合表达式(Expression Blend)还是必需的,此时采用VS 2008进行布局设计最主要的麻烦是它的XMAL设计器是只读的,不能从工具箱进行拖拉操作,一旦你放到某个位置后就不能再移动了,这个问题预计在不久的将来发布SP1时可能修复,在这个项目中使用Blend非常容易,但是在编写或编辑XMAL本身时,VS 2008的智能感应是一个巨大的优势,说不定这个功能将来就会包括在某个Blend发行版中。
我们在构建标准水印项目时,Silverlight 1.0中可用的控制集不包括Border,因此我们不得不使用Line来描述图像的控制,在Silverlight 2中,我们终于可以使用Border了,可比使用Line简单多了。
Silverlight 2自定义触发按钮控制器模板
<!-- ToggleButton Control Template -->
     <ControlTemplate TargetType="ToggleButton">
     <Grid x:Name="RootElement">
     <Grid.Resources>
<!-- Visual constants used by the template -->
     <Color x:Key="BaseColor">#FF003255</Color>
     <Color x:Key="LinearBevelLightStartColor">#FCFFFFFF
     </Color>     <Color x:Key="LinearBevelLightEndColor">#F4FFFFFF</Color>
     <Color x:Key="LinearBevelDarkStartColor">#E0FFFFFF</Color>
     <Color x:Key="LinearBevelDarkEndColor">#B2FFFFFF</Color>
     <Color x:Key="MouseOverLinearBevelDarkEndColor">
          #7FFFFFFF</Color>
     <Color x:Key="HoverLinearBevelLightStartColor">
          #FCFFFFFF</Color>
     <Color x:Key
          ="HoverLinearBevelLightEndColor">
          #EAFFFFFF</Color>
     <Color x:Key="HoverLinearBevelDarkStartColor">#D8FFFFFF</Color>
     <Color x:Key="HoverLinearBevelDarkEndColor">#4CFFFFFF</Color>
     <Color x:Key="CheckedLinearBevelLightStartColor">#FCFFFFFF</Color>
     <Color x:Key="CheckedLinearBevelLightEndColor">#EAFFFFFF</Color>
     <Color x:Key="CheckedLinearBevelDarkStartColor">#D8FFFFFF</Color>
     <Color x:Key="CheckedLinearBevelDarkEndColor">#4CFFFFFF</Color>
     <Color x:Key="CurvedBevelFillStartColor">#B3FFFFFF</Color>
     <Color x:Key="CurvedBevelFillEndColor">#3CFFFFFF</Color>
     <Color x:Key="HoverPressedCurvedBevelFillStartColor">#6FFFFFFF</Color>
     <Color x:Key="HoverPressedCurvedBevelFillEndColor">#39FFFFFF</Color>
     <Color x:Key="ArrowColor">#FF000000</Color>
     <Color x:Key="ArrowActiveColor">#FF00B300</Color>
     <Color x:Key="ArrowHoverColor">#FFFF0000</Color>
     <SolidColorBrush x:Key="BorderBrush" Color="#FF000000" />
     <SolidColorBrush x:Key="AccentBrush" Color="#FFFFFFFF" />
     <SolidColorBrush x:Key="DisabledBrush" Color="#A5FFFFFF" />
     <LinearGradientBrush x:Key="FocusedStrokeBrush"
          StartPoint="0.5,0"Endpoint="0.5,1">
     <GradientStop Color="#B2FFFFFF" Offset="0" />
     <GradientStop Color="#51FFFFFF" Offset="1" />
     <GradientStop Color="#66FFFFFF" Offset="0.325" />
     <GradientStop Color="#1EFFFFFF" Offset="0.325" />
     </LinearGradientBrush>
     </Grid.Resources>
<!-- Visual states of the togglebutton template -->
     <vsm:VisualStateManager.VisualStateGroups>
     <vsm:VisualStateGroup x:Name="CheckedMouseStates">
     <vsm:VisualState x:Name="MouseLeave">
     <Storyboard>
     <ColorAnimation Duration="0:0:0.1" Storyboard.TargetName="ArrowBrush"
     Storyboard.TargetProperty="Color" To="{StaticResource
     ArrowColor}" />
     </Storyboard>
     </vsm:VisualState>

     <vsm:VisualState x:Name="MouseEnter">
     <Storyboard>
     <ColorAnimation Duration="0:0:0.1"
Storyboard.TargetName="ArrowBrush"
     Storyboard.TargetProperty="Color" To="{StaticResource
ArrowHoverColor}" />
     </Storyboard>
     </vsm:VisualState>
     </vsm:VisualStateGroup>
     <vsm:VisualStateGroup x:Name="CommonStates">
     <vsm:VisualStateGroup.Transitions>
     <vsm:VisualTransition To="MouseOver" Duration="0:0:0.2" />
     <vsm:VisualTransition To="Pressed" Duration="0:0:0.1" />
     </vsm:VisualStateGroup.Transitions>
     <vsm:VisualState x:Name="Normal" />

     <vsm:VisualState x:Name="MouseOver">
     <Storyboard>
     <ColorAnimation Storyboard.TargetName="LinearBevelDarkEnd"
Storyboard.TargetProperty="Color" To="{StaticResource
MouseOverLinearBevelDarkEndColor}"
Duration="0" />
     </Storyboard>
     </vsm:VisualState>
     <vsm:VisualState x:Name="Pressed">
     <Storyboard>
     <DoubleAnimation Storyboard.TargetName="LinearBevelLightEnd"
Storyboard.TargetProperty="Offset" To=".2" Duration="0" />
     <ColorAnimation Storyboard.TargetName="LinearBevelLightStart"
Storyboard.TargetProperty="Color" To="{
StaticResource HoverLinearBevelLightEndColor}"
Duration="0" /><ColorAnimation Storyboard.TargetName="LinearBevelLightEnd"
Storyboard.TargetProperty="Color" To="{
StaticResource
HoverLinearBevelLightEndColor}"
Duration="0" />
     <ColorAnimation Storyboard.TargetName="LinearBevelDarkStart"
Storyboard.TargetProperty="Color" To="{
StaticResource HoverLinearBevelDarkStartColor}"Duration="0" />
     <ColorAnimation Storyboard.TargetName="LinearBevelDarkEnd"
Storyboard.TargetProperty="Color"
To="{
StaticResource HoverLinearBevelDarkEndColor}" Duration="0" />
      <DoubleAnimation Storyboard.TargetName="DownStroke"
Storyboard.TargetProperty="Opacity" To="1" Duration="0" />
     </Storyboard>
     </vsm:VisualState>
     <vsm:VisualState x:Name="Disabled">
     <Storyboard>
     <Storyboard.TargetName="DisabledVisual"
Storyboard.TargetProperty="Opacity"
To="1" Duration="0" />
     </Storyboard>
     </vsm:VisualState>
     </vsm:VisualStateGroup>
     <vsm:VisualStateGroup x:Name="CheckStates">
     <vsm:VisualStateGroup.Transitions>
     <vsm:VisualTransition Duration="0:0:0.1" />
     </vsm:VisualStateGroup.Transitions>
     <vsm:VisualState x:Name="Checked">
     <Storyboard>
     <DoubleAnimation Storyboard.TargetName="DownStroke"
Storyboard.TargetProperty="Opacity" To="1" Duration="0" />
     <DoubleAnimation Storyboard.TargetName="FocusVisualElement"
Storyboard.TargetProperty="Opacity" To="0" Duration="0" />
     <ColorAnimation  Storyboard.TargetName="ArrowBrush"
Storyboard.TargetProperty="Color" To="{
StaticResource ArrowActiveColor}" Duration="0"/>
     </Storyboard>
     </vsm:VisualState>
     <vsm:VisualState x:Name="Unchecked">
      <Storyboard>
      <DoubleAnimation Storyboard.TargetName="LinearBevelLightEnd"
Storyboard.TargetProperty ="Offset" To="0.35" Duration="0" />
     </Storyboard>
     </vsm:VisualState>
     <vsm:VisualState x:Name="Indeterminate">
     <Storyboard>
     <DoubleAnimation Storyboard.TargetName="LinearBevelLightEnd"
Storyboard.TargetProperty ="Offset" To="0.2"
Duration="0" />
     <DoubleAnimation Storyboard.TargetName
="IndeterminateNormal" Storyboard.TargetProperty="Opacity" To="1" Duration="0" />
     </Storyboard>
      </vsm:VisualState>
     </vsm:VisualStateGroup>
     <vsm:VisualStateGroup x:Name="FocusStates">
     <vsm:VisualState x:Name="Focused">
     <Storyboard>
<ObjectAnimationUsingKeyFrames Storyboard.TargetName
="FocusVisualElement"
Storyboard.TargetProperty="Visibility"Duration="0">
     <DiscreteObjectKeyFrame KeyTime="0">
<DiscreteObjectKeyFrame.Value>
<Visibility>Visible</Visibility>
</DiscreteObjectKeyFrame.Value>
     </DiscreteObjectKeyFrame>
     </ObjectAnimationUsingKeyFrames>
     </Storyboard>
     </vsm:VisualState>
     <vsm:VisualState x:Name="Unfocused">
     <Storyboard>
     <ObjectAnimationUsingKeyFrames Storyboard.TargetName
="FocusVisualElement"
Storyboard.TargetProperty="Visibility"Duration="0">
     <DiscreteObjectKeyFrame KeyTime="0">
<DiscreteObjectKeyFrame.Value><Visibility>Collapsed</Visibility>
</DiscreteObjectKeyFrame.Value>
</DiscreteObjectKeyFrame>
     </ObjectAnimationUsingKeyFrames>
     </Storyboard>
     </vsm:VisualState>
     </vsm:VisualStateGroup>
     </vsm:VisualStateManager.VisualStateGroups>
     <Rectangle RadiusX="1"
RadiusY="1" Margin="1,2,1.5,2" StrokeThickness="1">
     <Rectangle.Fill>
     <LinearGradientBrush StartPoint="0.7,0" Endpoint="0.7,1">
     <GradientStop x:Name="LinearBevelLightStart" Color="{
StaticResource LinearBevelLightStartColor}" Offset="0" />
     <GradientStop x:Name="LinearBevelLightEnd" Color="{
StaticResource LinearBevelLightEndColor}" Offset="0.35" />
     <GradientStop x:Name="LinearBevelDarkStart" Color="{
StaticResource LinearBevelDarkStartColor}" Offset="0.35" />
     <GradientStop x:Name="LinearBevelDarkEnd"
Color="{
StaticResource LinearBevelDarkEndColor}" Offset="1" />
     </LinearGradientBrush>
     </Rectangle.Fill>
     </Rectangle>
     <Grid x:Name="CurvedBevelScale" Margin="2">
     <Grid.RowDefinitions>
     <RowDefinition Height="7*" />
     <RowDefinition Height="3*" />
     </Grid.RowDefinitions>
      <Path x:Name="CurvedBevel" Stretch="Fill" Margin="1.5,1,1.5,2"
Data="F1 M0,0.02 L0,0.15
C0.15,0.22 0.3,0.25 0.5,0.25 0.7,0.25 0.85,
0.22 1,0.15 L1,0.02 1,0 0.02,0 0,0.02 z">
     <Path.Fill>
      <LinearGradientBrush StartPoint="0.5,0" Endpoint="0.5,1">
     <GradientStop x:Name="CurvedBevelFillStart" Color="{
StaticResource CurvedBevelFillStartColor}" Offset="0" />
     <GradientStop x:Name="CurvedBevelFillEnd" Color="{
StaticResource CurvedBevelFillEndColor}" Offset="1" />
     </LinearGradientBrush>
     </Path.Fill>
     </Path>
     </Grid>
     <Grid x:Name
="FocusVisualElement" Visibility="Collapsed">
     </Grid>
     <Grid x:Name="CheckedNormal" Opacity="0">
     <Rectangle Stroke="{TemplateBinding Background}" RadiusX="1"
RadiusY="1" StrokeThickness="1" Opacity="0.05" Margin="1.5,2.5,1.5,1.5" />
     <Rectangle Stroke="{TemplateBinding Background}" RadiusX="1"
RadiusY="1" StrokeThickness="1" Opacity="0.05" Margin="1.5,2.25,1.5,1.5" />
     <Rectangle Stroke="{TemplateBinding Background}" RadiusX="1"
RadiusY="1" StrokeThickness="1" Opacity="0.05" Margin="1.5,2,1.5,1.5" />
     <Rectangle Stroke="{TemplateBinding Background}" RadiusX="1"
RadiusY="1" StrokeThickness="1" Opacity="0.05" Margin="1.5,1.75,1.5,1.5" />
     <Rectangle Stroke="{TemplateBinding Background}" RadiusX="1"
RadiusY="1" StrokeThickness="1" Opacity="1" Margin="1" />
      <Rectangle RadiusX="1"
RadiusY="1" StrokeThickness="1" Margin="1" >
     <Rectangle.Stroke>
     <LinearGradientBrush Endpoint="0.5,1" StartPoint="0.5,0">
     <GradientStop Color="#A5FFFFFF" Offset="0" />
     <GradientStop Color="#FFFFFFFF" Offset="1" />
     </LinearGradientBrush>
     </Rectangle.Stroke>
     </Rectangle>
     </Grid>
     <Grid x:Name="CheckedPressed" Opacity="0">
     <Rectangle Stroke="{TemplateBinding Background}"  RadiusX="1"
RadiusY="1" StrokeThickness="1" Opacity="0.05" Margin="1.5,2.5,1.5,1.5" />
     <Rectangle Stroke="{TemplateBinding Background}"  RadiusX="1"
RadiusY="1" StrokeThickness="1" Opacity="0.05" Margin="1.5,2.25,1.5,1.5" />
      <Rectangle Stroke="{TemplateBinding Background}"  RadiusX="1"
RadiusY="1" StrokeThickness="1" Opacity="0.05" Margin="1.5,2,1.5,1.5" />
     <Rectangle Stroke="{TemplateBinding Background}"  RadiusX="1"
RadiusY="1" StrokeThickness="1" Opacity="0.05" Margin="1.5,1.75,1.5,1.5" />
     <Rectangle Stroke="{TemplateBinding Background}"  RadiusX="1"
RadiusY="1" StrokeThickness="1" Opacity="1" Margin="1" />
     <Rectangle RadiusX="1"
RadiusY="1" StrokeThickness="1" Margin="1">
     <Rectangle.Stroke>
     <LinearGradientBrush Endpoint="0.5,1" StartPoint="0.5,0">
     <GradientStop Color="#A5FFFFFF" Offset="0" />
     <GradientStop Color="#FFFFFFFF" Offset="1" />
     </LinearGradientBrush>
      </Rectangle.Stroke>
      </Rectangle>
     </Grid>
     <Grid x:Name="IndeterminateNormal" Opacity="0">
      <Rectangle Stroke="{TemplateBinding Background}"  RadiusX="1"
RadiusY="1" StrokeThickness="1" Opacity="0.05" Margin="1.5,2.5,1.5,1.5" />
      <Rectangle Stroke="{TemplateBinding Background}"  RadiusX="1"
RadiusY="1" StrokeThickness="1" Opacity="0.05" Margin="1.5,2.25,1.5,1.5" />
      <Rectangle Stroke="{TemplateBinding Background}"  RadiusX="1"
RadiusY="1" StrokeThickness="1" Opacity="0.05" Margin="1.5,2,1.5,1.5" />
      <Rectangle Stroke="{TemplateBinding Background}"  RadiusX="1"
RadiusY="1" StrokeThickness="1" Opacity="0.05" Margin="1.5,1.75,1.5,1.5" />
      <Rectangle Stroke="{TemplateBinding Background}"  RadiusX="1"
RadiusY="1" StrokeThickness="1" Opacity="1" Margin="1" />
     <Rectangle RadiusX="1"
RadiusY="1" StrokeThickness="1" Margin="1">
     <Rectangle.Stroke>
     <LinearGradientBrush Endpoint="0.5,1" StartPoint="0.5,0">
     <GradientStop Color="#A5FFFFFF" Offset="0" />
      <GradientStop Color="#FFFFFFFF" Offset="1" />
      </LinearGradientBrush>
      </Rectangle.Stroke>
      </Rectangle>
       </Grid>
       <Grid x:Name="IndeterminatePressed" Opacity="0">
      <Rectangle Stroke="{TemplateBinding Background}"  RadiusX="1"
RadiusY="1" StrokeThickness="1" Opacity="0.05" Margin="1.5,2.5,1.5,1.5" />
     <Rectangle Stroke="{TemplateBinding Background}" RadiusX="1"
RadiusY="1"StrokeThickness="1"Opacity="0.05" Margin="1.5,2.25,1.5,1.5" />
      <Rectangle Stroke="{TemplateBinding Background}" RadiusX="1"
RadiusY="1"StrokeThickness="1"Opacity="0.05" Margin="1.5,2,1.5,1.5" />
      <Rectangle Stroke="{TemplateBinding Background}" RadiusX="1"
RadiusY="1"StrokeThickness="1"Opacity="0.05" Margin="1.5,1.75,1.5,1.5" />
      <Rectangle Stroke="{TemplateBinding Background}" RadiusX="1"
RadiusY="1"StrokeThickness="1"Opacity="1"Margin="1" />
     <Rectangle RadiusX="1"
RadiusY="1"StrokeThickness="1"Margin="1">
      <Rectangle.Stroke>
      <LinearGradientBrush Endpoint="0.5,1" StartPoint="0.5,0">
      <GradientStop Color="#A5FFFFFF" Offset="0" />
      <GradientStop Color="#FFFFFFFF" Offset="1" />
      </LinearGradientBrush>
      </Rectangle.Stroke>
      </Rectangle>
      </Grid>
      <Grid x:Name="DownStroke" Opacity="0">
      <Rectangle Stroke="{TemplateBinding Background}" RadiusX="1"
RadiusY="1"StrokeThickness="1"Opacity="0.05" Margin="1.5,2.5,1.5,1.5" />
      <Rectangle Stroke="{TemplateBinding Background}" RadiusX="1"
RadiusY="1"StrokeThickness="1"Opacity="0.05" Margin="1.5,2.25,1.5,1.5" />
      <Rectangle Stroke="{TemplateBinding Background}" RadiusX="1"
RadiusY="1"StrokeThickness="1"Opacity="0.05" Margin="1.5,2,1.5,1.5" />
     <Rectangle Stroke="{TemplateBinding Background}" RadiusX="1"
RadiusY="1"StrokeThickness="1"Opacity="0.05" Margin="1.5,1.75,1.5,1.5" />
      <Rectangle Stroke="{TemplateBinding Background}" RadiusX="1"
RadiusY="1"StrokeThickness="1"Opacity="1" Margin="1" />
     <Rectangle RadiusX="1"
RadiusY="1" StrokeThickness="1" Margin="1">
     <Rectangle.Stroke>
     <LinearGradientBrush Endpoint="0.5,1" StartPoint="0.5,0">
     <GradientStop Color="#A5FFFFFF" Offset="0" />
     <GradientStop Color="#FFFFFFFF" Offset="1" />
     </LinearGradientBrush>
     </Rectangle.Stroke>
     </Rectangle>
     </Grid>
<!-- ToggleButton content -->
     <Grid>
      <Path Margin="0,0,0,0" HorizontalAlignment="Center"
VerticalAlignment="Center" Data="M 0,0 L 3.5,4 L 7,0 Z">
      <Path.Fill>
     <SolidColorBrush x:Name="ArrowBrush" Color="{
StaticResource ArrowColor}"/>
     </Path.Fill>
      </Path>
      </Grid>
     </Grid>
      </ControlTemplate>
|
控制器数据绑定 vs 事件处理程序
即使早期的XBAP项目几乎要完全依赖数据绑定,但在学习完这个领域的知识后,我们发现在Silverlight 2中的数据绑定仍然不够实用,既没有ElementName属性也没有Path属性,相反,我们使用了一系列的事件处理程序来设置TextBlock的文本属性,它与TextBox的为文本属性相当。
作者注记:要查看数据绑定在Silverlight中的地位,请参考silverlight.net上的该文(http://www.devx.com/RIA/link/38130)。
设置TextBlock的文本属性
当发生MouseLeave事件时,再次调用ApplyNewImprintColor方法,还原当前选择的水印颜色。
拖拉操作
不同的字体有不同的度量标准,当用户改变字体时,水印信息的布局不会总是那么理想,为了弥补这个缺陷,我们添加了一个功能,允许用户自行对浮动TextBlock进行拖拉操作,使其布局趋于美观,在Silverlight 1.0下要实现拖拉操作非常麻烦,但在Silverlight 2下就显得轻松多了,因为大家要做的就是从Silverlight帮助文件中拷贝粘贴代码就行了。
Silverlight 2文本拖拉操作
public void TextBlock_MouseDown(object sender, MouseEventArgs args)
{
    TextBlock item = sender as TextBlock;
    mouseVerticalPosition = args.GetPosition(null).Y;
    mouseHorizontalPosition = args.GetPosition(null).X;
    isMouseCaptured = true;
    item.CaptureMouse();
}

public void TextBlock_MouseMove(object
sender, MouseEventArgs args)
{
    TextBlock item = sender as TextBlock;
    if (isMouseCaptured)
    {
        // Calculate the current position of the object.
        double deltaV = args.GetPosition(null).Y
         - mouseVerticalPosition;
        double deltaH = args.GetPosition(null).X
         - mouseHorizontalPosition;
        double newTop = deltaV + (double)item.GetValue
         (Canvas.TopProperty);
        double MaxTop = cnvImprintArea.ActualHeight - item.ActualHeight;
        double MaxLeft = cnvImprintArea.ActualWidth - item.ActualWidth;
        //Put in some limitations to prevent a user from
        //dragging a TextBlock outside the imprint area
        if (newTop > MaxTop)
        {
            newTop = MaxTop;
        }
        if (newTop < 0)
        {
            newTop = 0;
        }
        double newLeft = deltaH +
(double)item.GetValue(Canvas.LeftProperty);
        if (newLeft > MaxLeft)
        {
            newLeft = MaxLeft;
        }
        if (newLeft < 0)
        {
            newLeft = 0;
        }
        // Set new position of object.
        item.SetValue(Canvas.TopProperty, newTop);
        item.SetValue(Canvas.LeftProperty, newLeft);
        // Update position global variables.
        mouseVerticalPosition = args.GetPosition(null).Y;
        mouseHorizontalPosition = args.GetPosition(null).X;
    }
}

public void
TextBlock_MouseUp(object sender, MouseEventArgs args)
{
    TextBlock item = sender as TextBlock;
    isMouseCaptured = false;
    item.ReleaseMouseCapture();
    mouseVerticalPosition = -1;
    mouseHorizontalPosition = -1;
}
|
自定义字体
婚礼策划师通常喜欢在打印时使用script-type字体,虽然Silverlight 2包括了大量的具有吸引力的字体,但它们都不太适合婚礼设计使用,幸运的是,在你的Silverlight 应用程序中可以包括自定义的字体,只需要简单的两步就可以完成:
将自定义字体拷贝到Web应用程序的Client Bin文件夹下(注意:不是Silverlight项目的Client Bin文件夹)
使用[FileName]#[FontName]格式引用你的字体,如:brushscn.ttf#BrushScript BT
Silverlight 2中使用自定义字体
//Using a custom font in Silverlight requires a combination of the filename
//along with the technical font name
string m_strAlexiCopperplate = @"alcoppln.ttf#Alexei Copperplate";
string m_strBrushScript = @"brushscn.ttf#BrushScript BT";
string m_strFlemishScript = @"flemscrn.ttf#FlemishScript BT";
string m_strFreestyle = @"frestysn.ttf#FreestyleScrD";
string m_strLinus = @"linusn.ttf#Linus";
string m_strParkAvenue = @"parkaven.ttf#ParkAvenue BT";
string m_strShelleyAllegro = @"shlyalln.ttf#ShelleyAllegro BT";
string m_strWeddingText = @"wedtxtn.ttf#WeddingText BT";
public void setFontFamilyProperty(string strFontFamily)
{
    try
    {
        string strSelectedFontFamily;
        switch (strFontFamily)
        {//When a given case contains two entries,
the upper entry come from a selection in the combo box
            //Lower entries come from saved designs
(some are identical, in which case only a
single entry is required)
            case  "Alexei Copperplate":

                strSelectedFontFamily = m_strAlexiCopperplate;
                break;
            case  "Brush Script":
            case  "BrushScript BT":
                strSelectedFontFamily = m_strBrushScript;
                break;
            case  "Flemish Script":
            case  "FlemishScript BT":
                strSelectedFontFamily = m_strFlemishScript;
                break;
            case  "Freestyle":
            case  "FreestyleScrD":
                strSelectedFontFamily = m_strFreestyle;
                break;
            case  "Linus":
                strSelectedFontFamily = m_strLinus;
                break;
            case  "Park Avenue":
            case  "ParkAvenue BT":
                strSelectedFontFamily = m_strParkAvenue;
                break;
            case  "Shelley Allegro":
            case  "ShelleyAllegro BT":
                strSelectedFontFamily = m_strShelleyAllegro;
                break;
            case  "Wedding Text":
            case  "WeddingText BT":
                strSelectedFontFamily = m_strWeddingText;
                break;
            default:
                strSelectedFontFamily = m_strAlexiCopperplate;
                break;
        }
        txbFirstName.FontFamily = new  FontFamily(strSelectedFontFamily);
        txbAndCharacter.FontFamily = new  FontFamily(strSelectedFontFamily);
        txbSecondName.FontFamily = new  FontFamily(strSelectedFontFamily);
        txbEventDate.FontFamily = new  FontFamily(strSelectedFontFamily);
        //Display the message about Drag and Drop capability
        bdrTooltips.Visibility = Visibility.Visible;
        txbTooltips.Text = "Imprints can be repositioned by dragging.";
        //Set a timer to hide the message about Drag and Drop
        m_dtDragAndDropMessageTimer.Interval =
new
TimeSpan(0, 0, 0, 10, 0);
// 10 Seconds
        m_dtDragAndDropMessageTimer.Tick += new
        EventHandler(dtDragAndDropMessageTimer_Tick);
        m_dtDragAndDropMessageTimer.Start();
    }
    Catch (System.Exception ex)
    {
        Console.WriteLine(ex.Message);
    }
}
|
使用前面我们自定义的combo box下来列表技术可以预览每种字体的显示效果。
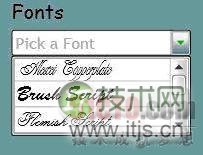
图5.存储设计参数的SQL Server表
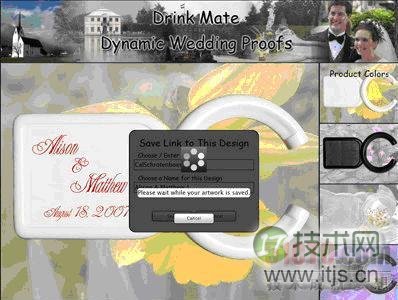
弹出控制器Silverlight 2代码
<!-- Popup to display stored links -->
<Popup x:Name="popDisplayStoredLinks">
    <Grid x:Name="grdDisplayStoredLinks" Background="#007799aa">
        <Grid.RowDefinitions>
            <RowDefinition />
            <RowDefinition Height="Auto" />
            <RowDefinition />
        </Grid.RowDefinitions>
        <Grid.ColumnDefinitions>
            <ColumnDefinition />
            <ColumnDefinition Width="Auto" />
            <ColumnDefinition />
        </Grid.ColumnDefinitions>
        <Border BorderBrush="Black" BorderThickness="2" Background="WhiteSmoke"
CornerRadius="15" Grid.Column="1"
Grid.Row="1">
            <StackPanel
Margin="8" Width="330" >
                <StackPanel
Orientation="Vertical">
                    <TextBlock
Margin="5,5,0,5"
HorizontalAlignment="Center"
FontFamily="Comic Sans MS"
                               FontSize="22" >
Saved Designs for </TextBlock>
                    <TextBlock
x:Name="txbDisplayStoredLinksUserID"
Margin="0,0,5,5"
HorizontalAlignment="Center"
                               FontFamily="Comic Sans MS"
FontSize="22"
Text="UserIDHere" />
                </StackPanel>
                <ListBox x:Name="lstSavedDesigns" SelectionChanged
="lstSavedDesigns_SelectionChanged"
                         MouseLeftButtonUp="lstSavedDesigns_MouseLeftButtonUp"
Margin="10" />
                <Button
x:Name="btnPopCancelDisplayStoredLinks"
Click="btnPopCancelDisplayStoredLinks_Click"
                        Margin="5"
Content="Cancel" Width="100"
HorizontalAlignment="Center" VerticalAlignment="Bottom" />
            </StackPanel>
        </Border>
    </Grid>
</Popup>        }
//This popup window is triggered
by setting its IsOpen property to true

void webService_GetDesignsByUserIdCompleted(object
sender, CustomerDesignsServiceReference.GetDesigns
ByUserIdCompletedEventArgs e)
{
    if (_dbOperationsStatus[e.UserState.ToString()] ==
_dbOperationStatus.Canceling)
    {
        _dbOperationsStatus[e.UserState.ToString()] =
_dbOperationStatus.Canceled;
    }
    else
    {
        try
        {
            RetrievalCircleAnimation.Stop();
            brdWaitAnimationRetrieveStoredLinks.Opacity = 0;
            m_dtDatabaseRetrievalTimeout.Stop();
            //Check to see how many results have
been returned
            //If no results, display an error message
in the existing form
            if (e.Result.Length < 1)
            {
                _dbOperationsStatus[e.UserState.ToString()] =
                _dbOperationStatus.Selected;
                txbRetrieveStoredLinksResults.Text = "No artwork
                found for UserID "
               + txtRetrievalUserID.Text;
                btnRetrieveStoredLinksMaskClose.Content = "Close";
                return;
            }
            //If there is only one result, just display the
                                        saved design immediately
            else if (e.Result.Length == 1)
            {
                _dbOperationsStatus[e.UserState.ToString()] =
                _dbOperationStatus.Selected;
                RetrieveStoredLinksMask.Visibility = Visibility.Collapsed;
                popRetrieveStoredLinks.IsOpen = false;
                m_cdSavedDesigns = e.Result.ToList();
                DisplaySavedDesign(0);
            }
            else if (e.Result.Length > 1)
            {
                _dbOperationsStatus[e.UserState.ToString()] =
                _dbOperationStatus.Selected;
                //If there are multiple results, save each record to a
                CustomerDesign object and put a link in the
                Display Stored Links popup
                RetrieveStoredLinksMask.Visibility = Visibility.Collapsed;
                m_cdSavedDesigns = e.Result.ToList();
                lstSavedDesigns.ItemsSource = m_cdSavedDesigns;
                lstSavedDesigns.DisplayMemberPath = "DesignName";
                popRetrieveStoredLinks.IsOpen = false;
                popDisplayStoredLinks.VerticalOffset =
                (MainImageViewer.ActualHeight / 2)
                - (174 / 2) + HeaderImage.ActualHeight - 25;
                popDisplayStoredLinks.HorizontalOffset =
                (HeaderImage.ActualWidth / 2)
                - (350 / 2);
                popDisplayStoredLinks.IsOpen = true;
                txbDisplayStoredLinksUserID.Text = e.Result[0].UserID.ToString();
            }
        }
        catch (System.Exception ex)
        {
            _dbOperationsStatus[e.UserState.ToString()] = _dbOperationStatus.Failed;
            txbRetrieveStoredLinksResults.Text = "An Error occurred while
            retrieving your artwork. Please try again.";
            btnRetrieveStoredLinksMaskClose.Content = "Close";
            btnRetrieveStoredLinksMaskClose.Focus();
            Console.WriteLine(ex.Message);
        }
    }
|
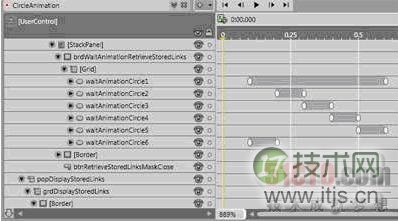
等待动画
因为与互联网远程服务器通讯过程可能变幻莫测,我们决定构造一个等待动画,告诉用户耐心等待数据的保存和检索,最近非常流行使用一系列的小圆圈排列成一个圆圈构成等待动画,在等待过程中,每个小圆圈逐个变换颜色和不透明度来表示进度
<!-- Wait Animation  -->
<Grid
x:Name="RetrieveStoredLinksMask" Visibility="Collapsed"  >
    <Rectangle
Fill="Black"  Opacity=".7"   RadiusX="13" RadiusY="13"/>
    <StackPanel  >
        <Border x:Name="brdWaitAnimationRetrieveStoredLinks"
BorderThickness="0"
BorderBrush="#FF000000"
                Margin="0,40,0,20"
Height="64"
Width="64" >
            <Border.Background>
                <LinearGradientBrush
EndPoint="0.5,1"
StartPoint="0.5,0">
                    <GradientStop
Color="#FF7A7777"/>
                    <GradientStop
Color="#FF181717" Offset="1"/>
                </LinearGradientBrush>
            </Border.Background>
            <Grid
ShowGridLines>="False" >
                <Grid.ColumnDefinitions>
                    <ColumnDefinition
Width="Auto" />
                    <ColumnDefinition
Width="Auto"/>
                    <ColumnDefinition />
                    <ColumnDefinition
Width="Auto" />
                </Grid.ColumnDefinitions>
                <Grid.RowDefinitions>
                    <RowDefinition />
                    <RowDefinition
Height="Auto" />
                    <RowDefinition
Height="Auto" />
                    <RowDefinition />
                </Grid.RowDefinitions>
                <Ellipse x:Name
="waitAnimationCircle1" Grid.Row
="3" Grid.Column="1"
Grid.ColumnSpan="2"
                         Margin="0,-10,0,0"
Height="16" Width="16" Fill="White" />
                <Ellipse x:Name="waitAnimationCircle2"
Grid.Row="1"
Grid.Column="0" Margin="6,2,0,0"
                         Height="16"
Width="16" Fill="#FFA7A6A6" />
                <Ellipse x:Name="waitAnimationCircle3"
Grid.Row="0"
Grid.Column="1"
Grid.ColumnSpan="2"
                         Margin="0,0,0,-10" Height="16"
Width="16" Fill="#FFA7A6A6" />
                <Ellipse x:Name
="waitAnimationCircle4"
Grid.Row="1"
Grid.Column="3"
Margin="0,0,6,0"
                         Height="16"
Width="16" Fill="#FFA7A6A6" />
                <Ellipse x:Name
="waitAnimationCircle5"
Grid.Row="2"
Grid.Column="3"
Margin="0,0,6,0"
                         Height="16"
Width="16" Fill="#FFA7A6A6" />
                <
Ellipse x:Name
="waitAnimationCircle6" Grid.Row="2"
Grid.Column="0"
Margin="6,2,0,0"
                         Height="16"
Width="16" Fill="#FFA7A6A6" />
            </Grid>
        </Border>
        <Border
Background="White"
CornerRadius="5"
Margin="20" >
            <TextBlock
x:Name="txbRetrieveStoredLinksResults"
HorizontalAlignment="Center"
TextWrapping="Wrap"
Text=""
                       Foreground="Black"
TextAlignment="Center" />
         </Border>
        <Button x:Name="btnRetrieveStoredLinksMaskClose" Click
="btnRetrieveStoredLinksMaskClose_Click"
                HorizontalAlignment="Center" Margin="20"
Width="100" Content="Cancel"></ Button>
    </StackPanel>
</Grid><!
--End of Wait Animation -->
//This wait animation can be started by calling its Begin() method
 and later stopped by calling its Stop() method.
RetrievalCircleAnimation.Begin();
...
RetrievalCircleAnimation.Stop();
|
构造WPF/Silverlight动画是Expression Blend的长处,在这个案例中,动画通过使用关键帧改变小圆圈的颜色来实现旋转效果,有用的构造动画的技术将会被吸收到更大的项目中,然后用Blend创建一个独立的Silverlight项目,当动画被提炼后,就会进入到主项目中。
构造一个WCF Web Service
我们选择将顾客的设计保存到SQL Server的机制是一个由web服务器托管的WCF Web Service,构造WCF Service模型是Jesse Liberty另一篇优秀指南的主题(http://www.devx.com/RIA/link/38156)。
按照确认的最佳实践,我们的Service Contract包含一个界面中,Operation Contracts包括一个保存设计参数、通过UserID和设计ID(AutoID)检索设计信息的方法。
[ServiceContract]
public interface ICustomerDesigns
{
[OperationContract]
List |
Silverlight 2创建一个自定义service factory
protected override ServiceHost CreateServiceHost(Type serviceType, Uri
[] baseAddresses)
{
// If more than one base address exists then return the second
// address, otherwise return the first address
 (protected override ServiceHost CreateServiceHost
(Type serviceType, Uri[] baseAddresses)
{
    // If more than one base address exists then return the second
    // address, otherwise return the first address
    //(You might be wondering why we're picking the second address here
    //rather than the first.
    //For us, the second address holds the correct address for our
deployment domain
//www.silverlightblend.com. You may need to modify this code to return
//a different/custom base address depending on your IIS server configuration.
if (baseAddresses.Length > 1)
{
return new ServiceHost(serviceType, baseAddresses[1]);
}
else
{
return new ServiceHost(serviceType, baseAddresses[0]);
}
}
|
最后,不要忘了你的web服务器(不局限于IIS)必须配有Silverlight MIME类型,特别是Silverlight 2使用的.xap文件,(xap application/x-silverlight-app)假如你使用的是IIS 6,这个MIME类型必须通过管理控制台设置,假如是IIS 7,可以设置到web.config文件中,关于这个问题的更多解释,请参考Joe的博客文章(http://www.devx.com/RIA/link/38160)。
推荐资源
你在开发Silverlight 2应用程序时,有一些有用的资源可以参考一下: