iOS开发简单的音频播放器
发布时间:2015-02-05 00:00 来源:青玉伏案的博客
今天第一次接触IOS开发的UI部分,之前学Objective-C的时候一直在模拟的使用Target-Action回调模式,今天算是真正的用了一次。为了熟悉一下基本控件的使用方法,和UI部分的回调,下面开发了一个特别简易的音频播放器,来犒劳一下自己这一天的UI学习成果。在用到UI的控件时假如很好的理解之前博客在Objective-C中的Target-Action回调模式,感觉控件的用法会很顺手。下面的简易播放器没有用到多高深的技术,只是一些基本控件和view的使用。
话不多说简单的介绍一下今天的音频播放器。在播放器中我们用到了UIProgressView(进度条)来显示音频的播放进度,用UILabel显示播放的当前时间和总时间。用UIImageView和UIImagel来加入图片,用UISegmentedControl来控制播放和暂停,用滑动器UISlider来控制音频的音量。上面的执行组件都是UIKit中的组件,大家要定时的获取音频的播放时间,我们还要用到NSTimer来定时获取CurrentTime。播放器怎么能少的了关键的组件呢,我们还需要引入框架AVFoundation.framework。我们会用到组件AVAudioPlayer来播放我们的音频。
下面是简易音频播放器的截图:
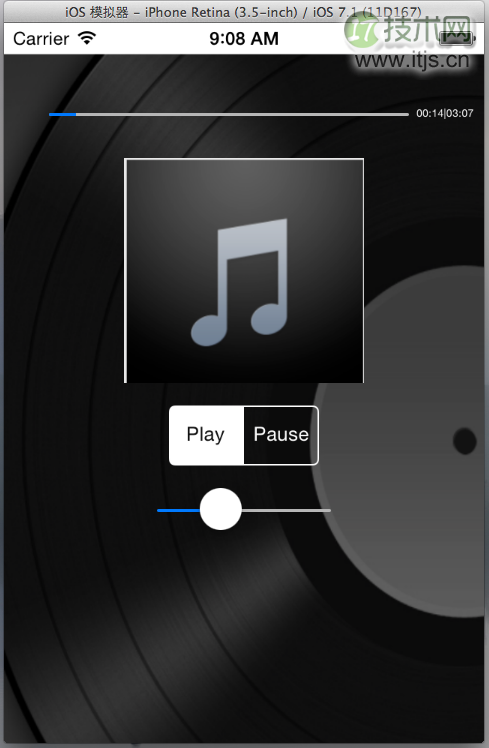
1.功能介绍:
点击播放会播放默认歌曲,同时显示播放进度和播放当前时间,下面的slider可以调节音频的声音大小。
2.主要开发过程
1.在我们的XCode中新建一个SingleView的iPhone的工程,为了更好的理解和配置控件和view,就不使用storyboard来进行控件的拖拽啦。在我们新建工程下面的ViewController.m编写我们的代码,为了隐藏我们音频播放器使用的控件和控件回调的方法,我们在ViewController.m中用延展来对我们的组件和方法进行声明。代码如下:
#import "ViewController.h"

@interface ViewController ()

//添加背景用的ImageView
@property (strong, nonatomic) UIImageView *backView;

//播放进度条
@property (strong, nonatomic) UIProgressView *progress;

//选项卡按钮,赋值播放和暂停
@property (strong, nonatomic) UISegmentedControl * segment;

//slider,用滑动器来设置音量的大小
@property (strong, nonatomic) UISlider *slider;

//timer,来更新歌曲的当前时间
@property (strong, nonatomic) NSTimer *timer;

//显示时间的lable
@property (strong, nonatomic) UILabel *label;

//加入图片,中间的图片
@property (strong, nonatomic) UIImageView *imageView;

//声明播放器,来播放我们的音频文件
@property (strong, nonatomic) AVAudioPlayer *player;

//在暂停和播放时回调此按钮
-(void)tapSegment;

//更新歌曲时间
-(void)time;

//改变声音大小
-(void) changeVo;

@end
2.上面是我们的延展部分,来进行我们的组件的声明和方法的声明,具体的实现就写在本文件中的@implementation中,我们把组件的实现和配置写在-(void) viewDidLoad;方法中,该方法会在主视图加载完毕后执行。在编写实现代码之前大家要把我们用到的媒体文件拖入到我们的Project中,下面是具体代码的实现。
1).下面的代码是为我们的应用添加背景图片,也就是我们上面图片中的黑色背景图片,在初始化ImageView的时候我们知道view的位置和大小CGRectMack(x, y, width, height); 用Image来通过图片文件的名称来载入我们的图片,把图片视图插入到主视图的最底层,同时设置其index来实现,代码如下。
/*添加背景图片*/
//初始化ImageView,并设置大小
self.backView = [[UIImageView alloc] initWithFrame:CGRectMake(0, 20, 320, 480)];
//加载图片,我们的图片名为background
UIImage *backImage = [UIImage imageNamed:@"background"];
//添加背景图片到ImageView
self.backView.image = backImage;
//把ImageView添加到view的最底层
[self.view insertSubview:self.backView atIndex:0];
2).初始化我们的进度条并设置进度条的位置和大小,对进度值初始化为零。同时把进度条通过addSubView加入到我们的主视图中
/*实例化进度条,并添加到主视图*/
self.progress = [[UIProgressView alloc] initWithFrame:CGRectMake(30, 60, 240, 10)];
[self.view addSubview:self.progress];
self.progress.progress = 0;
3).添加中间的图片,和添加背景图片相似,在这就不赘述了代码如下:
//添加中间的图片
  self.imageView = [[UIImageView alloc] initWithFrame:CGRectMake(80, 90, 160, 150)];
  UIImage *image = [UIImage imageNamed:@"image.png"];
  self.imageView.image = image;
  [self.view addSubview:self.imageView];
4).初始化我们的segment, 在初始化segment的同时,我们通过便利初始化方法来指定有几个按键和每个按键中的值。配置的时候我们可以通过tintColor来设置我们segment的颜色,通过Target-Action来注册segment要回调的方法,同时指定回调的事件,我们设置的时UIControlEventValueChange,就是当segment的selectedSegmentIndex改变时,调用我们注册的方法。代码如下:
//添加segmentControl
self.segment = [[UISegmentedControl alloc] initWithItems:@[@"Play", @"Pause"]];
self.segment.frame = CGRectMake(110, 255, 100, 40);
self.segment.tintColor = [UIColor whiteColor];
//注册回调方法,在segment的值改变的时候回调注册的方法
[self.segment addTarget:self action:@selector(tapSegment) forControlEvents:UIControlEventValueChanged];
[self.view addSubview:self.segment];
5).下面的代码是要初始化并配置我们的音频播放器组件,配置的时候指定我们音频所在路径的url,并且回写播放的错误代码如下
//配置播放器
NSBundle *bundle = [NSBundle mainBundle];
NSString * path = [bundle pathForResource:@"music" ofType:@"mp3"];
NSURL *musicURL = [NSURL fileURLWithPath:path];
NSError *error;
self.player = [[AVAudioPlayer alloc] initWithContentsOfURL:musicURL error:&error];
if (self.player == nil) {
    NSLog(@"error = %@", [error localizedDescription]);
}
6).设置定时器,并注册大家要间隔调用的方法。下面的定时器是1秒中重复调用我们当前view中的time方法,在time方法中我们会获取当前音频的当前播放时间,并在lable中显示,稍后会提到
//设置时间,每一秒钟调用一次绑定的方法
self.timer = [NSTimer scheduledTimerWithTimeInterval:1 target:self selector:@selector(time) userInfo:nil repeats:YES];
7).添加我们的音量控制组件,并绑定当slider的值改变是调用哪一个方法。同时指定slider的最大值和最小值,代码如下:
//添加slider
self.slider = [[UISlider alloc] initWithFrame:CGRectMake(100,300, 120 , 50)];
[self.slider addTarget:self action:@selector(changeVo) forControlEvents:UIControlEventValueChanged];

[self.view addSubview:self.slider];
//设置slider最小值和最大值
self.slider.minimumValue = 1;
self.slider.maximumValue = 10;
3.组件初始化和配置完毕,接下来我们就得实现各控件要回调的方法。
1).当slider的值改变是大家要调用的方法如下,就是要设置一下音频播放器的声音,代码如下:
//改变声音
-(void)changeVo
{
    self.player.volume = self.slider.value;
}
2).定时器定时调用的方法如下,在此方法中大家要获取音频的总时间和当前播放时间,并把秒转换成分钟(下面的代码没有使用NSDateFormat来转换时间,读者可以用自己的方法来转换),转换完以后在label中显示当前时间和总时间,代码如下
//更新时间
-(void) time
{
    //获取音频的总时间
    NSTimeInterval totalTimer = self.player.duration;
    //获取音频的当前时间
    NSTimeInterval currentTime = self.player.currentTime;
    //根据时间比设置进度条的进度
    self.progress.progress = (currentTime/totalTimer);

    //把秒转换成分钟
    NSTimeInterval currentM = currentTime/60;
    currentTime = (int)currentTime%60;

    NSTimeInterval totalM = totalTimer/60;
    totalTimer = (int)totalTimer%60;

    //把时间显示在lable上
    NSString *timeString = [NSString stringWithFormat:@"%02.0f:%02.0f|%02.0f:%02.0f",currentM, currentTime, totalM,totalTimer];
    self.label.text = timeString;
}
3).下面是segment要回调的方法根据segment的selectedSegmentIndex来设置播放器的播放还是停止,代码如下:
//segment所回调的方法
-(void) tapSegment
{
    int isOn = self.segment.selectedSegmentIndex;
    if (isOn == 0)
    {
        [self.player play];

    }
    else
    {
        [self.player pause];
    }

}
以上是整个简易播放器的代码,以为功能特别简单所以代码也不多。主要通过上面的简易播放器来熟悉一下IOS开发中控件和view的使用流程,笔者也在一直学习,水平有限,欢迎批评指正。