
Google近期在Udacity上发布了Android性能优化的在线课程,分别从渲染,运算与内存,电量几个方面介绍了如何去优化性能,这些课程是Google之前在Youtube上发布的Android性能优化典范专题课程的细化与补充。
下面是电量篇章的学习笔记,部分内容与前面的性能优化典范有重合,欢迎大家一起学习交流!
1)Understanding Battery Drain
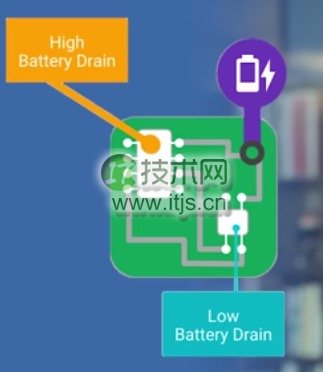
手机各个硬件模块的耗电量是不一样的,有些模块非常耗电,而有些模块则相对显得耗电量小很多。
电量消耗的计算与统计是一件麻烦而且矛盾的事情,记录电量消耗本身也是一个费电量的事情。唯一可行的方案是使用第三方监测电量的设备,这样才能够获取到真实的电量消耗。
当设备处于待机状态时消耗的电量是极少的,以N5为例,打开飞行模式,可以待机接近1个月。可是点亮屏幕,硬件各个模块就需要开始工作,这会需要消耗很多电量。
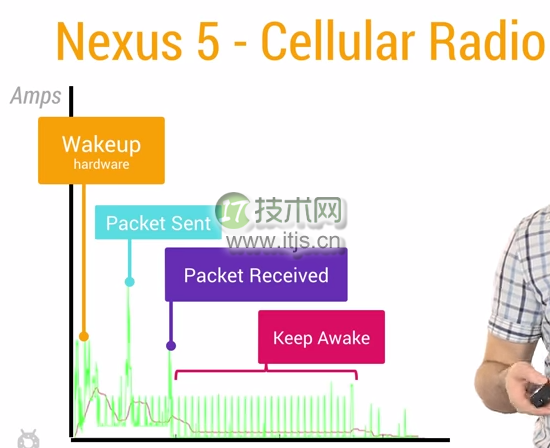
使用WakeLock或者JobScheduler唤醒设备处理定时的任务之后,一定要及时让设备回到初始状态。每次唤醒蜂窝信号进行数据传递,都会消耗很多电量,它比WiFi等操作更加的耗电。
2)Battery Historian
Battery Historian是Android 5.0开始引入的新API。通过下面的指令,可以得到设备上的电量消耗信息:
$ adb shell dumpsys batterystats > xxx.txt  //得到整个设备的电量消耗信息
$ adb shell dumpsys batterystats > com.package.name > xxx.txt //得到指定app相关的电量消耗信息
得到了原始的电量消耗数据之后,我们需要通过Google编写的一个python脚本把数据信息转换成可读性更好的html文件:
$ python historian.py xxx.txt > xxx.html
打开这个转换过后的html文件,可以看到类似Traceview生成的列表数据,这里的数据信息量很大,这里就不展开了。

3)Track Battery Status & Battery Manager
我们可以通过下面的代码来获取手机的当前充电状态:
// It is very easy to subscribe to changes to the battery state, but you can get the current
// state by simply passing null in as your receiver.  Nifty, isn't that
IntentFilter filter = new IntentFilter(Intent.ACTION_BATTERY_CHANGED);
Intent batteryStatus = this.registerReceiver(null, filter);
int chargePlug = batteryStatus.getIntExtra(BatteryManager.EXTRA_PLUGGED, -1);
boolean acCharge = (chargePlug == BatteryManager.BATTERY_PLUGGED_AC);
if (acCharge) {
    Log.v(LOG_TAG,“The phone is charging!”);
}
在上面的例子演示了如何立即获取到手机的充电状态,得到充电状态信息之后,我们可以有针对性的对部分代码做优化。比如我们可以判断只有当前手机为AC充电状态时 才去执行一些非常耗电的操作。
/**
 * This method checks for power by comparing the current battery state against all possible
 * plugged in states. In this case, a device may be considered plugged in either by USB, AC, or
 * wireless charge. (Wireless charge was introduced in API Level 17.)
 */
private boolean checkForPower() {
    // It is very easy to subscribe to changes to the battery state, but you can get the current
    // state by simply passing null in as your receiver.  Nifty, isn't that
    IntentFilter filter = new IntentFilter(Intent.ACTION_BATTERY_CHANGED);
    Intent batteryStatus = this.registerReceiver(null, filter);

    // There are currently three ways a device can be plugged in. We should check them all.
    int chargePlug = batteryStatus.getIntExtra(BatteryManager.EXTRA_PLUGGED, -1);
    boolean usbCharge = (chargePlug == BatteryManager.BATTERY_PLUGGED_USB);
    boolean acCharge = (chargePlug == BatteryManager.BATTERY_PLUGGED_AC);
    boolean wirelessCharge = false;
    if (Build.VERSION.SDK_INT >= Build.VERSION_CODES.JELLY_BEAN_MR1) {
        wirelessCharge = (chargePlug == BatteryManager.BATTERY_PLUGGED_WIRELESS);
    }
    return (usbCharge || acCharge || wirelessCharge);
}
4)Wakelock and Battery Drain
高效的保留更多的电量与不断促使用户使用你的App会消耗电量,这是矛盾的选择题。不过我们可以使用一些更好的办法来平衡两者。
假设你的手机里面装了大量的社交类应用,即使手机处于待机状态,也会经常被这些应用唤醒用来检查同步新的数据信息。Android会不断关闭各种硬件来延长手机的待机时间,首先屏幕会逐渐变暗直至关闭,然后CPU进入睡眠,这一切操作都是为了节约宝贵的电量资源。但是即使在这种睡眠状态下,大多数应用还是会尝试进行工作,他们将不断的唤醒手机。一个最简单的唤醒手机的方法是使用PowerManager.WakeLock的API来保持CPU工作并防止屏幕变暗关闭。这使得手机可以被唤醒,执行工作,然后回到睡眠状态。知道如何获取WakeLock是简单的,可是及时释放WakeLock也是非常重要的,不恰当的使用WakeLock会导致严重错误。例如网络请求的数据返回时间不确定,导致本来只需要10s的事情一直等待了1个小时,这样会使得电量白白浪费了。这也是为何使用带超时参数的wakelock.acquice()方法是很关键的。
但是仅仅设置超时并不足够解决问题,例如设置多长的超时比较合适?什么时候进行重试等等?解决上面的问题,正确的方式可能是使用非精准定时器。通常情况下,我们会设定一个时间进行某个操作,但是动态修改这个时间也许会更好。例如,假如有另外一个程序需要比你设定的时间晚5分钟唤醒,最好能够等到那个时候,两个任务捆绑一起同时进行,这就是非精确定时器的核心工作原理。我们可以定制计划的任务,可是系统假如检测到一个更好的时间,它可以推迟你的任务,以节省电量消耗。
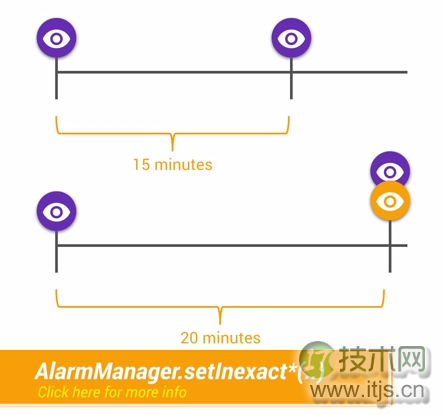
这正是JobScheduler API所做的事情。它会根据当前的情况与任务,组合出理想的唤醒时间,例如等到正在充电或者连接到WiFi的时候,或者集中任务一起执行。我们可以通过这个API实现很多免费的调度算法。
5)Network and Battery Drain
下面内容来自官方Training文档中高效下载章节关于手机(Radio)蜂窝信号对电量消耗的介绍。
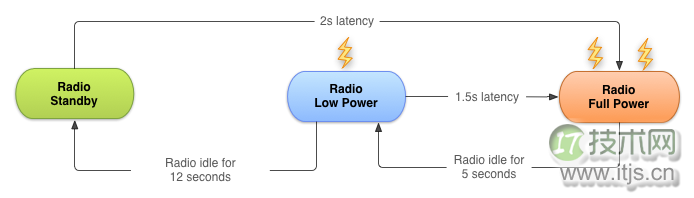
通常情况下,使用3G移动网络传输数据,电量的消耗有三种状态:
Full power: 能量最高的状态,移动网络连接被激活,允许设备以最大的传输速率进行操作。
Low power: 一种中间状态,对电量的消耗差不多是Full power状态下的50%。
Standby: 最低的状态,没有数据连接需要传输,电量消耗最少。
下图是一个典型的3G Radio State Machine的图示
总之,为了减少电量的消耗,在蜂窝移动网络下,最好做到批量执行网络请求,尽量避免频繁的间隔网络请求。
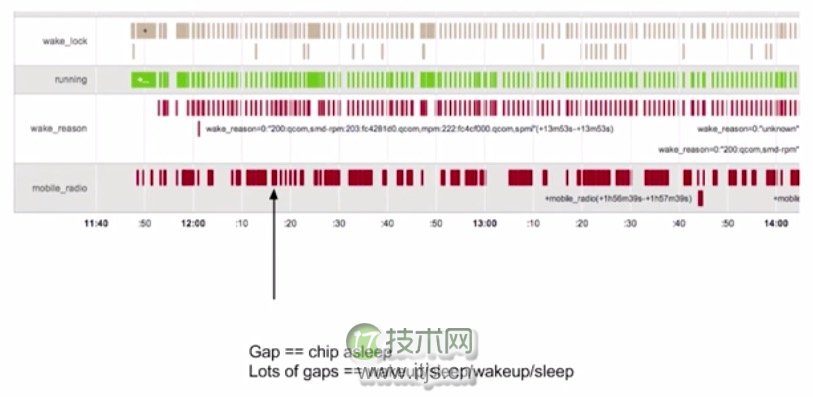
通过前面学习到的Battery Historian我们可以得到设备的电量消耗数据,假如数据中的移动蜂窝网络(Mobile Radio)电量消耗呈现下面的情况,间隔很小,又频繁断断续续的出现,说明电量消耗性能很不好:
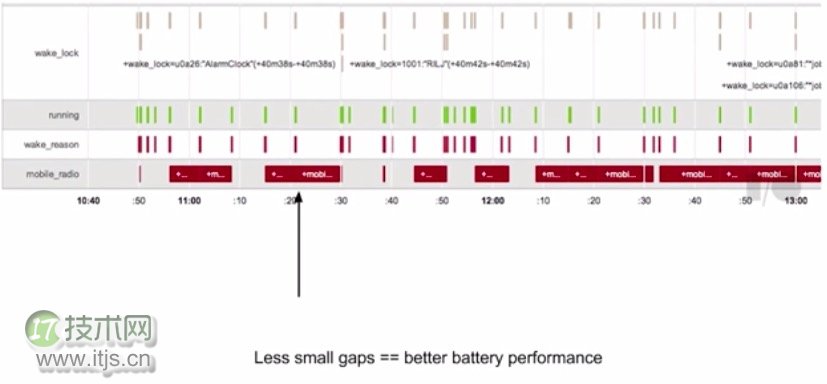
经过优化之后,假如呈现下面的图示,说明电量消耗的性能是良好的:
另外WiFi连接下,网络传输的电量消耗要比移动网络少很多,应该尽量减少移动网络下的数据传输,多在WiFi环境下传输数据。

那么如何才能够把任务缓存起来,做到批量化执行呢?下面就轮到Job Scheduler出场了。
6)Using Job Scheduler
使用Job Scheduler,应用需要做的事情就是判断哪些任务是不紧急的,可以交给Job Scheduler来处理,Job Scheduler集中处理收到的任务,选择合适的时间,合适的网络,再一起进行执行。
下面是使用Job Scheduler的一段简要示例,需要先有一个JobService:
public class MyJobService extends JobService {
    private static final String LOG_TAG = "MyJobService";

    @Override
    public void onCreate() {
        super.onCreate();
        Log.i(LOG_TAG, "MyJobService created");
    }

    @Override
    public void onDestroy() {
        super.onDestroy();
        Log.i(LOG_TAG, "MyJobService destroyed");
    }

    @Override
    public boolean onStartJob(JobParameters params) {
        // This is where you would implement all of the logic for your job. Note that this runs
        // on the main thread, so you will want to use a separate thread for asynchronous work
        // (as we demonstrate below to establish a network connection).
        // If you use a separate thread, return true to indicate that you need a "reschedule" to
        // return to the job at some point in the future to finish processing the work. Otherwise,
        // return false when finished.
        Log.i(LOG_TAG, "Totally and completely working on job " + params.getJobId());
        // First, check the network, and then attempt to connect.
        if (isNetworkConnected()) {
            new SimpleDownloadTask() .execute(params);
            return true;
        } else {
            Log.i(LOG_TAG, "No connection on job " + params.getJobId() + "; sad face");
        }
        return false;
    }

    @Override
    public boolean onStopJob(JobParameters params) {
        // Called if the job must be stopped before jobFinished() has been called. This may
        // happen if the requirements are no longer being met, such as the user no longer
        // connecting to WiFi, or the device no longer being idle. Use this callback to resolve
        // anything that may cause your application to misbehave from the job being halted.
        // Return true if the job should be rescheduled based on the retry criteria specified
        // when the job was created or return false to drop the job. Regardless of the value
        // returned, your job must stop executing.
        Log.i(LOG_TAG, "Whelp, something changed, so I'm calling it on job " + params.getJobId());
        return false;
    }

    /**
     * Determines if the device is currently online.
     */
    private boolean isNetworkConnected() {
        ConnectivityManager connectivityManager =
                (ConnectivityManager) getSystemService(Context.CONNECTIVITY_SERVICE);
        NetworkInfo networkInfo = connectivityManager.getActiveNetworkInfo();
        return (networkInfo != null && networkInfo.isConnected());
    }

    /**
     *  Uses AsyncTask to create a task away from the main UI thread. This task creates a
     *  HTTPUrlConnection, and then downloads the contents of the webpage as an InputStream.
     *  The InputStream is then converted to a String, which is logged by the
     *  onPostExecute() method.
     */
    private class SimpleDownloadTask extends AsyncTask<JobParameters, Void, String> {

        protected JobParameters mJobParam;

        @Override
        protected String doInBackground(JobParameters... params) {
            // cache system provided job requirements
            mJobParam = params[0];
            try {
                InputStream is = null;
                // Only display the first 50 characters of the retrieved web page content.
                int len = 50;

                URL url = new URL("https://www.google.com");
                HttpURLConnection conn = (HttpURLConnection) url.openConnection();
                conn.setReadTimeout(10000); //10sec
                conn.setConnectTimeout(15000); //15sec
                conn.setRequestMethod("GET");
                //Starts the query
                conn.connect();
                int response = conn.getResponseCode();
                Log.d(LOG_TAG, "The response is: " + response);
                is = conn.getInputStream();

                // Convert the input stream to a string
                Reader reader = null;
                reader = new InputStreamReader(is, "UTF-8");
                char[] buffer = new char[len];
                reader.read(buffer);
                return new String(buffer);

            } catch (IOException e) {
                return "Unable to retrieve web page.";
            }
        }

        @Override
        protected void onPostExecute(String result) {
            jobFinished(mJobParam, false);
            Log.i(LOG_TAG, result);
        }
    }
}
然后模拟通过点击Button触发N个任务,交给JobService来处
public class FreeTheWakelockActivity extends ActionBarActivity {
    public static final String LOG_TAG = "FreeTheWakelockActivity";

    TextView mWakeLockMsg;
    ComponentName mServiceComponent;

    @Override
    protected void onCreate(Bundle savedInstanceState) {
        super.onCreate(savedInstanceState);
        setContentView(R.layout.activity_wakelock);

        mWakeLockMsg = (TextView) findViewById(R.id.wakelock_txt);
        mServiceComponent = new ComponentName(this, MyJobService.class);
        Intent startServiceIntent = new Intent(this, MyJobService.class);
        startService(startServiceIntent);

        Button theButtonThatWakelocks = (Button) findViewById(R.id.wakelock_poll);
        theButtonThatWakelocks.setText(R.string.poll_server_button);

        theButtonThatWakelocks.setOnClickListener(new View.OnClickListener() {
            @Override
            public void onClick(View v) {
                    pollServer();
            }
        });
    }

    /**
     * This method polls the server via the JobScheduler API. By scheduling the job with this API,
     * your app can be confident it will execute, but without the need for a wake lock. Rather, the
     * API will take your network jobs and execute them in batch to best take advantage of the
     * initial network connection cost.
     *
     * The JobScheduler API works through a background service. In this sample, we have
     * a simple service in MyJobService to get you started. The job is scheduled here in
     * the activity, but the job itself is executed in MyJobService in the startJob() method. For
     * example, to poll your server, you would create the network connection, send your GET
     * request, and then process the response all in MyJobService. This allows the JobScheduler API
     * to invoke your logic without needed to restart your activity.
     *
     * For brevity in the sample, we are scheduling the same job several times in quick succession,
     * but again, try to consider similar tasks occurring over time in your application that can
     * afford to wait and may benefit from batching.
     */
    public void pollServer() {
        JobScheduler scheduler = (JobScheduler) getSystemService(Context.JOB_SCHEDULER_SERVICE);
        for (int i=0; i<10; i++) {
            JobInfo jobInfo = new JobInfo.Builder(i, mServiceComponent)
                    .setMinimumLatency(5000) // 5 seconds
                    .setOverrideDeadline(60000) // 60 seconds (for brevity in the sample)
                    .setRequiredNetworkType(JobInfo.NETWORK_TYPE_ANY) // WiFi or data connections
                    .build();

            mWakeLockMsg.append("Scheduling job " + i + "!n");
            scheduler.schedule(jobInfo);
        }
    }
}