
上一章节中(Android让Fragment加载到Activity中),我们对Fragment的生命周期进行了简单介绍,这一章节将对生命周期和返回栈进行详细介绍。
一、Fragment的生命周期初探:
因为Fragment必须嵌入在Acitivity中使用,所以Fragment的生命周期和它所在的Activity是密切相关的。
假如Activity是暂停状态,其中所有的Fragment都是暂停状态;假如Activity是stopped状态,这个Activity中所有的Fragment都不能被启动;假如Activity被销毁,那么它其中的所有Fragment都会被销毁。
但是,当Activity在活动状态,可以独立控制Fragment的状态,比如加上或者移除Fragment。
当这样进行fragment transaction(转换)的时候,可以把fragment放入Activity的back stack中,这样用户就可以进行返回操作。
使用Fragment时,需要继承Fragment或者Fragment的子类(DialogFragment, ListFragment, PreferenceFragment, WebViewFragment),所以Fragment的代码看起来和Activity的类似。
每当创建一个Fragment时,首先添加以下三个回调方法:
onCreate():系统在创建Fragment的时候调用这个方法,这里应该初始化相关的组件,一些即便是被暂停或者被停止时依然需要保留的东西。 onCreateView():当第一次绘制Fragment的UI时系统调用这个方法,该方法将返回一个View,假如Fragment不提供UI也可以返回null。注意,假如继承自ListFragment,onCreateView()默认的实现会返回一个ListView,所以不用自己实现。 onPause():当用户离开Fragment时第一个调用这个方法,需要提交一些变化,因为用户很可能不再返回来。将Fragment加载到Activity当中有两种方式:
方式一:添加Fragment到Activity的布局文件当中 方式二:在Activity的代码中动态添加Fragment(荐)第一种方式虽然简单但灵活性不够。添加Fragment到Activity的布局文件当中,就等同于将Fragment及其视图与activity的视图绑定在一起,且在activity的生命周期过程中,无法切换fragment视图。
第二种方式比较复杂,但也是唯一一种可以在运行时控制fragment的方式(加载、移除、替换)。
二、Fragment的生命周期详解:
先来看一下官方文档的图片吧:
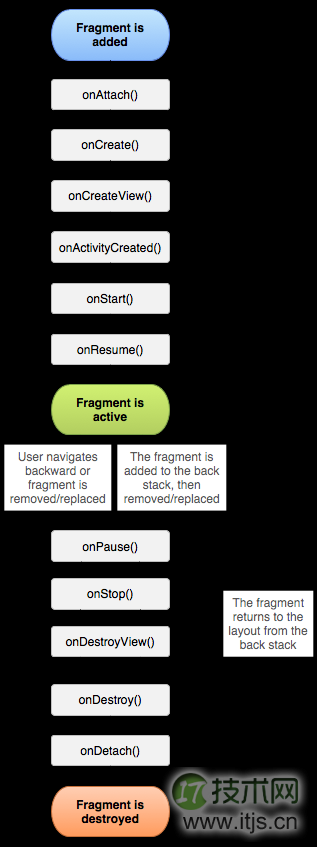
我们再把Activity的生命周期和Fragment的生命周期对比一下,就清楚很多了:
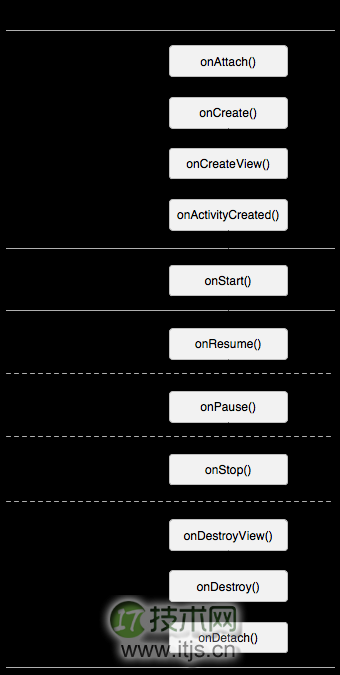
我们还是在实例中来看一下Fragment的生命周期吧。
【实例】在MainActivity中加载一个Fragment:(完整版代码如下)
我们所创建的Fragment的布局文件fragment01.xml的代码如下:
< xml version="1.0" encoding="utf-8" >
<LinearLayout xmlns:android="http://schemas.android.com/apk/res/android"
    android:layout_width="match_parent"
    android:layout_height="match_parent"
    android:orientation="vertical" >
    <RatingBar
        android:id="@+id/ratingBar1"
        android:layout_width="wrap_content"
        android:layout_height="wrap_content" />
    <Button
        android:id="@+id/button1"
        android:layout_width="wrap_content"
        android:layout_height="wrap_content"
        android:text="Button" />

</LinearLayout>
MyFragment.java代码如下:(注意生命周期中每个方法的作用)
  1 package com.example.m01_fragmentlifecycle;
  2
  3 import android.app.Activity;
  4 import android.app.Fragment;
  5 import android.os.Bundle;
  6 import android.util.Log;
  7 import android.view.LayoutInflater;
  8 import android.view.View;
  9 import android.view.ViewGroup;
 10
 11 public class MyFragment extends Fragment {
 12     private final String TAG = "MyFragment";
 13
 14     //获得activity的传递的值
 15     @Override
 16     public void onAttach(Activity activity) {
 17         // TODO Auto-generated method stub
 18         super.onAttach(activity);
 19         Log.i(TAG, "--MyFragment->>onAttach");
 20     }
 21
 22     //实例化成员变量
 23     @Override
 24     public void onCreate(Bundle savedInstanceState) {
 25         // TODO Auto-generated method stub
 26         super.onCreate(savedInstanceState);
 27         Log.i(TAG, "--MyFragment->>onCreate");
 28     }
 29
 30     //给当前的fragment绘制UI布局,可以使用线程更新UI
 31     @Override
 32     public View onCreateView(LayoutInflater inflater, ViewGroup container,
 33             Bundle savedInstanceState) {
 34         Log.i(TAG, "--MyFragment->>onCreateView");
 35         View view = inflater.inflate(R.layout.fragment01, null);
 36         // TODO Auto-generated method stub
 37         return view;
 38     }
 39
 40     //表示activity执行oncreate方法完成了的时候会调用此方法
 41     @Override
 42     public void onActivityCreated(Bundle savedInstanceState) {
 43         // TODO Auto-generated method stub
 44         super.onActivityCreated(savedInstanceState);
 45         Log.i(TAG, "--MyFragment->>onActivityCreated");
 46     }
 47
 48     //和activity一致
 49     @Override
 50     public void onStart() {
 51         // TODO Auto-generated method stub
 52         super.onStart();
 53         Log.i(TAG, "--MyFragment->>onStart");
 54     }
 55
 56     //和activity一致
 57     @Override
 58     public void onResume() {
 59         // TODO Auto-generated method stub
 60         super.onResume();
 61         Log.i(TAG, "--MyFragment->>onResume");
 62     }
 63
 64     //和activity一致
 65     @Override
 66     public void onPause() {
 67         // TODO Auto-generated method stub
 68         super.onPause();
 69         Log.i(TAG, "--MyFragment->>onPause");
 70     }
 71
 72     //和activity一致
 73     @Override
 74     public void onStop() {
 75         // TODO Auto-generated method stub
 76         super.onStop();
 77         Log.i(TAG, "--MyFragment->>onStop");
 78     }
 79
 80     //表示fragment销毁相关联的UI布局
 81     @Override
 82     public void onDestroyView() {
 83         // TODO Auto-generated method stub
 84         super.onDestroyView();
 85         Log.i(TAG, "--MyFragment->>onDestroyView");
 86     }
 87
 88     //销毁fragment对象
 89     @Override
 90     public void onDestroy() {
 91         // TODO Auto-generated method stub
 92         super.onDestroy();
 93         Log.i(TAG, "--MyFragment->>onDestroy");
 94     }
 95
 96     //脱离activity
 97     @Override
 98     public void onDetach() {
 99         // TODO Auto-generated method stub
100         super.onDetach();
101         Log.i(TAG, "--MyFragment->>onDetach");
102     }
103 }
activity_main.xml的代码如下:
<LinearLayout xmlns:android="http://schemas.android.com/apk/res/android"
    xmlns:tools="http://schemas.android.com/tools"
    android:layout_width="match_parent"
    android:layout_height="match_parent"
    android:orientation="horizontal"
    tools:context=".MainActivity" >

    <LinearLayout
        android:id="@+id/line"
        android:layout_width="wrap_content"
        android:layout_height="match_parent"
        android:orientation="vertical" >
    </LinearLayout>

</LinearLayout>
MainActivity.java的代码如下:
 1 package com.example.m01_fragmentlifecycle;
 2
 3 import android.os.Bundle;
 4 import android.app.Activity;
 5 import android.app.FragmentManager;
 6 import android.app.FragmentTransaction;
 7 import android.util.Log;
 8 import android.view.Menu;
 9
10 public class MainActivity extends Activity {
11     private final String TAG = "MainActivity";
12     private FragmentManager manager;
13     private FragmentTransaction transaction;
14
15     @Override
16     protected void onCreate(Bundle savedInstanceState) {
17         super.onCreate(savedInstanceState);
18         setContentView(R.layout.activity_main);
19         manager = getFragmentManager();
20         transaction = manager.beginTransaction();
21         MyFragment fragment = new MyFragment();
22         transaction.add(R.id.line, fragment);
23         transaction.commit();
24         Log.i(TAG, "--MainActivity->>onCreate");
25     }
26
27     @Override
28     protected void onStart() {
29         // TODO Auto-generated method stub
30         super.onStart();
31         Log.i(TAG, "--MainActivity->>onStart");
32     }
33
34     @Override
35     protected void onResume() {
36         // TODO Auto-generated method stub
37         super.onResume();
38         Log.i(TAG, "--MainActivity->>onResume");
39     }
40
41     @Override
42     protected void onPause() {
43         // TODO Auto-generated method stub
44         super.onPause();
45         Log.i(TAG, "--MainActivity->>onPause");
46     }
47
48     @Override
49     protected void onStop() {
50         // TODO Auto-generated method stub
51         super.onStop();
52         Log.i(TAG, "--MainActivity->>onStop");
53     }
54
55     @Override
56     protected void onRestart() {
57         // TODO Auto-generated method stub
58         super.onRestart();
59         Log.i(TAG, "--MainActivity->>onRestart");
60     }
61     @Override
62     protected void onDestroy() {
63         // TODO Auto-generated method stub
64         super.onDestroy();
65         Log.i(TAG, "--MainActivity->>onDestroy");
66     }
67
68     @Override
69     public boolean onCreateOptionsMenu(Menu menu) {
70         // Inflate the menu; this adds items to the action bar if it is present.
71         getMenuInflater().inflate(R.menu.main, menu);
72         return true;
73     }
74 }
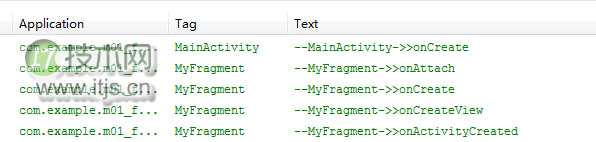
可以看到,上面的代码在每个生命周期的方法里都打印了日志,然后我们来运行一下程序,可以看到打印日志如下:
初次加载:(分成两部分来看)

点击一下home键(或接入电话),打印日志如下:

重新进入进入程序(或电话结束),打印日志如下:

点击back键退出程序,打印日志如下:

通过上面的日志,我们能够看出,Fragment和Activity的生命周期太相似了。只是有几个Activity中没有的新方法,需要重点介绍一下:
onAttach方法:Fragment和Activity建立关联的时候调用(获得activity的传递的值) onCreateView方法:为Fragment创建视图(加载布局)时调用(给当前的fragment绘制UI布局,可以使用线程更新UI) onActivityCreated方法:当Activity中的onCreate方法执行完后调用(表示activity执行oncreate方法完成了的时候会调用此方法) onDestroyView方法:Fragment中的布局被移除时调用(表示fragment销毁相关联的UI布局) onDetach方法:Fragment和Activity解除关联的时候调用(脱离activity)三、Fragment返回栈的管理:
将Fragment添加到返回栈中:
假设现在我们有两个Fragment:Fragment01和Fragment02,我们现在从Fragment01的界面跳到Fragment02,然后按Back键,发现程序是直接退出了,而不是返回到Fragment01。假如现在想实现以下功能:从Fragment01的界面跳到Fragment02,然后按Back键,会返回到Fragment01。这个功能该怎么实现呢?这其实就利用到了返回栈的知识。
其实很简单,FragmentTransaction中提供了一个addToBackStack()方法,可以将一个事务添加到返回栈中。
我们先回顾一下之前动态加载Fragment的代码,然后在此基础之上,增加一行代码就可以将Fragment添加到返回栈中:(即第07行代码)
//步骤一:添加一个FragmentTransaction的实例
FragmentManager fragmentManager =getFragmentManager();
FragmentTransaction transaction = fragmentManager.beginTransaction();
//步骤二:用add()方法加上Fragment的对象
RightFragment rightFragment = new RightFragment();
transaction.add(R.id.right, rightFragment);
transaction.addToBackStack(null); //步骤三:调用commit()方法使得FragmentTransaction实例的改变生效
transaction.commit();
第07行代码:我们在事务提交之前调用了FragmentTransaction的addToBackStack()方法,它可以接受一个名字用于描述返回栈的状态,,一般传入null即可。
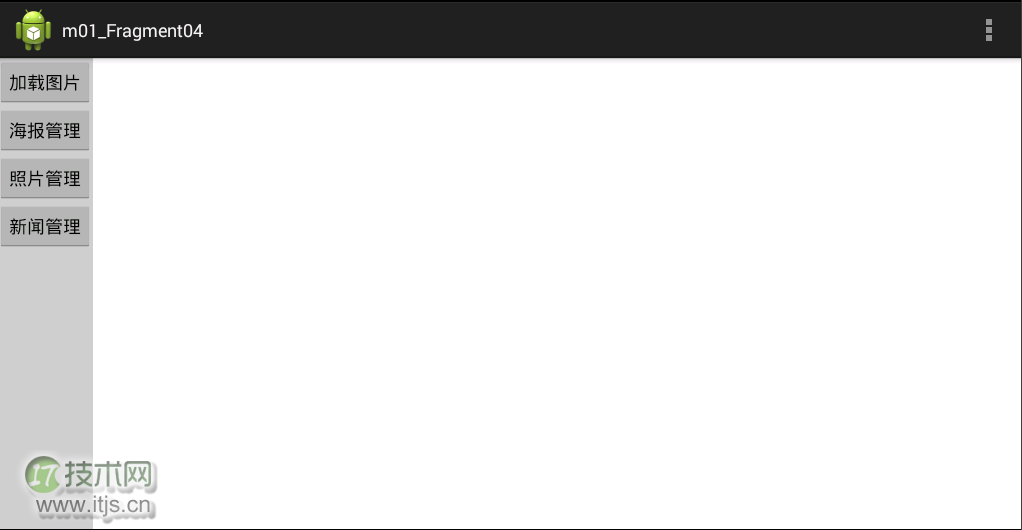
【实例】现在通过代码来实现以下界面(下面的图片为程序运行时加载的首页),并且把每一个Fragment都加入到返回栈当中去,然后观察其生命周期的变化。完整代码如下:
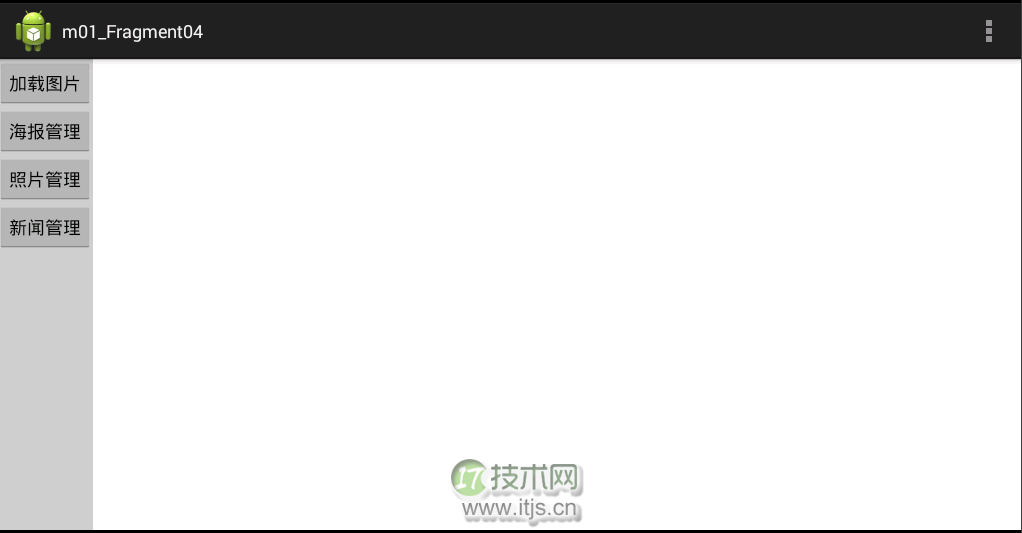
首先新建工程文件m01_Fragment04,然后开始我们的代码之旅:
我们先把右侧的四个Fragment建起来吧:
Fragment01.java主要部分的代码如下:
 1 package com.example.m01_fragment04;
 2
 3 import android.app.Fragment;
 4 import android.os.Bundle;
 5 import android.view.LayoutInflater;
 6 import android.view.View;
 7 import android.view.ViewGroup;
 8
 9 public class Fragment01 extends Fragment {
10
11     @Override
12     public void onCreate(Bundle savedInstanceState) {
13         super.onCreate(savedInstanceState);
14     }
15
16     @Override
17     public View onCreateView(LayoutInflater inflater, ViewGroup container,
18             Bundle savedInstanceState) {
19         View view = inflater.inflate(R.layout.f1, null);
20         return view;
21     }
22     @Override
23     public void onPause() {
24         super.onPause();
25     }
26 }
为避免啰嗦,这里就不把Fragment01生命周期中的其他函数罗列出来了,我们只要知道在实际代码中这些函数都是加了的。
Fragment01的布局文件f1.xml的代码如下:
< xml version="1.0" encoding="utf-8" >
<LinearLayout xmlns:android="http://schemas.android.com/apk/res/android"
    android:layout_width="match_parent"
    android:layout_height="match_parent"
    android:orientation="vertical" >
    <TextView
        android:id="@+id/textView1"
        android:layout_width="wrap_content"
        android:layout_height="wrap_content"
        android:text="加载图片" />
</LinearLayout>
然后依次新建出Fragment02、Fragment03、Fragment04的java代码和布局文件。
MainActivity的布局文件activity_main.xml代码如下:
<LinearLayout xmlns:android="http://schemas.android.com/apk/res/android"
    xmlns:tools="http://schemas.android.com/tools"
    android:layout_width="match_parent"
    android:layout_height="match_parent"
    tools:context=".MainActivity" >

    <LinearLayout
        android:id="@+id/left"
        android:layout_width="wrap_content"
        android:layout_height="match_parent"
        android:background="#CCCCCC"
        android:orientation="vertical" >

        <Button
            android:id="@+id/button1"
            android:layout_width="wrap_content"
            android:layout_height="wrap_content"
            android:text="加载图片" />

        <Button
            android:id="@+id/button2"
            android:layout_width="wrap_content"
            android:layout_height="wrap_content"
            android:text="海报管理" />

        <Button
            android:id="@+id/button3"
            android:layout_width="wrap_content"
            android:layout_height="wrap_content"
            android:text="照片管理" />

        <Button
            android:id="@+id/button4"
            android:layout_width="wrap_content"
            android:layout_height="wrap_content"
            android:text="新闻管理" />

    </LinearLayout>

    <LinearLayout
        android:id="@+id/right"
        android:layout_width="0dp"
        android:layout_height="match_parent"
        android:layout_weight="1"
        android:orientation="vertical" >
    </LinearLayout>

</LinearLayout>
其中,第一个LinearLayout表示左侧的按钮,第二个LinearLayout留给右边的Fragment。
MainActivity.java的代码如下:
 1 package com.example.m01_fragment04;
 2
 3 import android.os.Bundle;
 4 import android.app.Activity;
 5 import android.app.FragmentManager;
 6 import android.app.FragmentTransaction;
 7 import android.view.Menu;
 8 import android.view.View;
 9 import android.view.View.OnClickListener;
10 import android.widget.Button;
11
12 public class MainActivity extends Activity  implements OnClickListener{
13
14     private FragmentManager manager;
15     private FragmentTransaction transaction;
16     private Button button1,button2,button3,button4;
17
18     @Override
19     protected void onCreate(Bundle savedInstanceState) {
20         super.onCreate(savedInstanceState);
21         setContentView(R.layout.activity_main);
22
23     manager = getFragmentManager();
24         button1 = (Button)this.findViewById(R.id.button1);
25         button1.setOnClickListener(this);
26         button2 = (Button)this.findViewById(R.id.button2);
27         button2.setOnClickListener(this);
28         button3 = (Button)this.findViewById(R.id.button3);
29         button3.setOnClickListener(this);
30         button4 = (Button)this.findViewById(R.id.button4);
31         button4.setOnClickListener(this);
32
33     }
34
35     @Override
36     public boolean onCreateOptionsMenu(Menu menu) {
37         // Inflate the menu; this adds items to the action bar if it is present.
38         getMenuInflater().inflate(R.menu.main, menu);
39         return true;
40     }
41
42     //通过点击不同的按钮,跳转到不同的Fragment
43     @Override
44     public void onClick(View v) {
45         // TODO Auto-generated method stub
46 transaction = manager.beginTransaction(); 47         switch (v.getId()) {
48         case R.id.button1:
49             Fragment01 fragment01 = new Fragment01();
50             transaction.replace(R.id.right, fragment01, "fragment01");
51             transaction.addToBackStack("fragment01");// 添加到Activity管理的回退栈中。
52             break;
53
54         case R.id.button2:
55             Fragment02 fragment02 = new Fragment02();
56             transaction.replace(R.id.right, fragment02, "fragment02");
57             transaction.addToBackStack("fragment02");// 添加到Activity管理的回退栈中。
58             break;
59
60         case R.id.button3:
61             Fragment03 fragment03 = new Fragment03();
62             transaction.replace(R.id.right, fragment03, "fragment03");
63             transaction.addToBackStack("fragment03");// 添加到Activity管理的回退栈中。
64             break;
65
66         case R.id.button4:
67             Fragment04 fragment04 = new Fragment04();
68             transaction.replace(R.id.right, fragment04, "fragment04");
69             transaction.addToBackStack("fragment04");// 添加到Activity管理的回退栈中。
70             break;
71         }
72  transaction.commit();
73     }
74
75 }
上当代码中,通过点击不同的按钮,就能跳到对应的Fragment,而这四个Fragment都已经加入到了返回栈当中。运行程序之后,也是这样的。
注意第46行和第72行,transaction = manager.beginTransaction()意味着开始,transaction.commit()意味着结束。
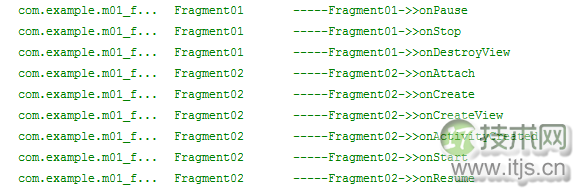
我们就其中的fragment01和fragment02来讨论一下他们的生命周期的变化:
运行程序后,界面如下,没有任何fragment被加载:
点击左侧第一个按钮,加载fragment01:

点击左侧第二个按钮,加载fragment02(此时fragment01被替换,并被压到了栈当中):
注:假如fragment01在替换的时候没有被压到栈中,那就会被销毁,在执行完onDestroyView()方法后,会继续执行onDestroy()和onDetach()方法。
按Back键,fragment01重新返回到屏幕:(fragment02被销毁)
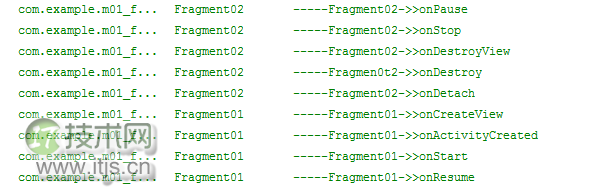
再按Back键,fragment01被销毁:

注:Fragment的返回栈由Activity管理;而Activity的返回栈由系统管理。